Skip to content
tegolySIGN
Home tegoly Support German

Introduction

2
  • What is tegolySIGN
  • tegolySIGN Roadmap

First steps

4
  • Installation of the TEAMS APP
  • Grant access
  • How to get started with a trial subscription
  • How do I log in to tegolySIGN

tegolyDATEV Connector Installation

5
  • Installation tegolyDATEV Connector
  • Configuring the tegolyDATEV Connector
  • Terminal server
  • Multiple Terminal Servers
  • Desktop

Signing with tegolySIGN

16
  • How to prepare documents for signature
  • The Enterprise Version
  • Add contacts to the document
  • 2-factor authentication in the Enterprise version
  • Order
  • Maturity
  • Ready
  • Stamp
  • Favorites
  • Forms
  • Signing with QES
  • Authenticate for QES
  • Sign with Verimi eID
  • MultiSign
  • Signature link
  • Forwarding Signature Operations

Signing documents

4
  • Open a document
  • Signing a document
  • Reject
  • Save

Statistics

1
  • Statistics on your documents

Documents

4
  • List of all documents
  • Sort documents
  • Document Filters
  • Process documents

Administration

10
  • Statistics
  • Assign users with tegolySIGN’s Teams app
  • Assign Administrators
  • Subscription Management
  • Features in the Enterprise Version
  • General settings
  • DATEV
  • Assign users in the tegolySIGN WebApp (not MS Teams)
  • tegolySIGN Portal
  • Group function

Binder

1
  • The tegoly binder

General information on the digital signature

2
  • The eSignature
  • Your review helps us a lot!

DATEV-DMS

8
  • Preconditions
  • Document(s) from DATEV handed over for signature
  • Installation and setup
  • How does my signed document get back in DATEV-DMS
  • tegolySIGN Connector – Configure DATEV status
  • Transfer e-mail addresses from the client
  • tegolyDATEV Connector Update
  • Start tegolySIGN in DATEV

Power Automate Connector

2
  • A workflow example
  • What is Microsoft Power Automate

Templates

3
  • Create Templates
  • Send Templates
  • Edit templates

Trial period

1
  • Onboarding

DATEV Installation

6
  • Installation tegolyDATEV Connector
  • Configuring the tegolyDATEV Connector
  • Terminal server
  • Multiple Terminal Servers
  • Desktop
  • How do I log in to tegolySIGN

tegolySIGN Portal

1
  • The tegolySIGN Portal
  • Home
  • Docs
  • tegolySIGN
  • DATEV-DMS
  • Start tegolySIGN in DATEV
View Categories

Start tegolySIGN in DATEV

Since tegolySIGN is a webapp, i.e. browser-based application, you can integrate it into your DATEV workstation. It could look like this.

Procedure

Please scroll down in the DATEV workplace on the left under “Our law firm”.
At the bottom you will find “Current Information”***.
Please click on the right mouse button in the area of the menu items. After that, the following menu appears:

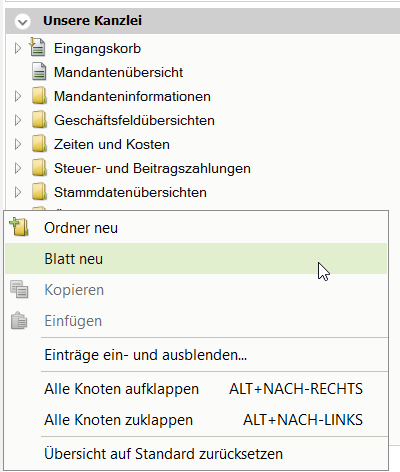
Click on “New sheet” and the following window will appear:

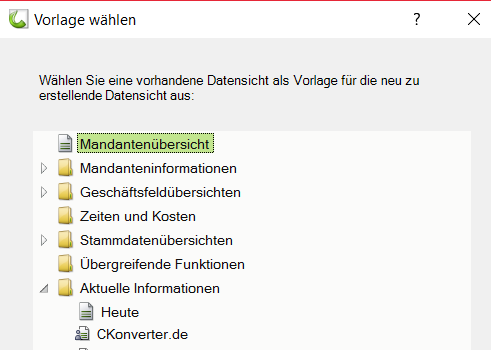
Now please set it to “Today” at the bottom and confirm with OK.

Now a new sheet is inserted under “current information” with the name “copy from today”. Please rename it to “tegolySIGN” by pressing the right mouse button and selecting the item “rename”.

Double-click on this sheet and then close all windows specified by DATEV in the window by clicking on the X in the upper right corner.

Then click on “+Insert content” and select “internet – Browser”.
Make windows big. Now you will see the browser with the DATEV page.
Then click on the wrench in the upper right corner, “Settings to the browser”
and copy this web address into it: signature.tegoly.com .

If you click on the wrench in the upper right corner again, you can also display the navigation.

Finally, please click on the tab with the name “tegolySIGN” at the top and open the menu with the right mouse button. Now please tick “Select this worksheet at startup”.

If you do not see “current information” in your overview, please open the menu with the right mouse button in the “our law firm” area and display the item via “Show and hide entries”.

Hat Dir dieser Artikel geholfen?
tegolySIGN

© 2025 tegolySIGN